Wednesday, October 31, 2012

Happy Halloween, MDS Style

In addition to the free downloads Stampin' Up! is offering for Digital Scrapbook Day this week, all Digital Scrapbook Kits are also 50% off.  There are over 70 to choose from including two with a Halloween theme.  So since today is Halloween, I decided to share the Wicked Fun Kit.

I don't make a lot of cards with My Digital Studio because that is one thing I enjoy making on my own.  But I thought it would be fun to put this on Facebook today to wish all my friends a WICKED Halloween. I used the recoloring feature to color the books.  For the hat, I placed a punch behind the band to color it (in the negative space of the stamp).
Colors: Rich Razzleberry, Old Olive, Basic Black and Dusty Durango.  Digital Stamps and Designer Series Paper: Wicked Fun Kit.  Other: Antique Brads Digital Embellishments, and assorted punches.
This kit also comes with a 12x12 scrapbook template.  So all I did for this page was to plug in my own pictures from last Halloween and add my journaling.

Wicked Fun Digital Kit 12x12 Template.
You can check out all the 50% off Digital Kits by clicking on the Shop Now button above and click through to the online store.  Choose My Digital Studio and Digital Content.  There will be a box showing 50% off items.  Don't forget to download your free items while you are there too.

I hope you all have a wonderfully wicked and safe Halloween!

Tuesday, October 30, 2012

MDS Free Downloads!

First of all, a big thanks to all who made the one-day stamp sale a big success for me!  I appreciate my loyal customers.  

Second of all, no, I don't usually post on Tuesdays, but this week is an exception.  This week I am celebrating Digital Scrapbook Day with posts about the free and discounted downloads that are available through November 5.

Yesterday, I showed you a project with the free Split Second Template Kit.  Today, I'm showing the also FREE Enjoying Everything Kit and the Days in December Kit:

Enjoying Everything Kit
Now, this kit is a little girly. If you know me, you know that we are lacking in the girly department around my house. But I thought it was perfect for an Easter picture of my boys.  The kit comes with a 4-piece digital stamp brush kit, four embellishments and four designer series papers.  It does not come with a template, but I CASE'd the sample layout Stampin' Up! shows for the kit.

Days in December Kit

The Days in December kit comes with a 33-piece digital stamp brush set, 29 embellishments and a 1-page template.  What I have above is the template that I simply added "December" too.  It would make a great cover for a scrapbook about your December Traditions.  Or leave December off, and you can use the squares for an advent calendar.

To get the three free kits, visit my online store at paula.stampinup.net and click shop now. On the right side of the screen, under the FREE Trial of MDS2, you will see three boxes with the free downloads.  Don't have My Digital Studio?  Well by all means, download the freebies anyway.  You can use them with other digital scrapbooking software.  Just choose "other application" when downloading.  But I know if you try MDS2, you will love it, so you might as well get your free 30 day trial at the same time and get using it!

Come back tomorrow to see some of the kits you can get 50% off this week too.  I will see you then!

Monday, October 29, 2012

MDS Monday All Week!


 Welcome to Digital Scrapbooking Week!  Stampin' Up! will be celebrating all week, so I have decided to also join in the celebration.  Stampin' Up! is giving away three free downloads and offering 50% off all Digital Scrapbooking Kits.  Each day this week, I will feature one of the free or discounted kits on my page.  Also, Friday will be the Stampin' Addicts Blog Hop featuring My Digital Studio.

Today, I am featuring the Split Second Kit that is available free from my online store.  I love this kit because it isn't too girly and you know we don't have too many girls around my house. It was the perfect kit to showcase these beach pictures of my boys:

All elements from Split Second Designer Template Pages.
The kit comes with two 12x12 templates and all I did here was put my own pictures and journaling on the pages and voila!  The kit comes with a 12-piece stamp brush set, two designer series papers, and two embellishments as well as the templates.  You will want this one for sure!


Also, when you are over visiting my online store, don't forget all stamp sets are 15% off TODAY only.  You don't want to miss out on this sale.  And come back tomorrow to see another free download.

Friday, October 26, 2012

Sell-A-Stamp Spooktacular & WICKED Wood Projects

Have you heard the news?  Stampin' Up! is doing something I have never seen them do: discounting all stamp sets 15% for one day only, Monday, October 29!  So get your wish lists out get them all at  fantastic savings!   You can shop online on Monday, or contact me by 8 p.m. that night if you are local and want to save on shipping.  But you won't want to miss out on this special!


And in case you missed my story last week about my wood projects, no, I haven't suddenly become a wood crafter.  And no, this will not become a regular feature on my blog.  In fact, while I still have some wood projects to finish, I won't be posting another one for while because I am a procrastinator and well, they are Christmas projects.  So I have weeks to get around to doing those.

But I promised to show you the Halloween projects I made at the same time as the Owls so here we go:

Current Stampin' Up!: Brights Glimmer Brad, Vintage Faceted Designer Button.  Retired Stampin' Up!: Cast-A-Spell Designer Series Paper, Black Jewel Flourish, 5/8" Basic Black Grosgrain Ribbon, 1/4" Pumpkin Pie Grosgrain Ribbon. 

Current Stampin' Up!: Round Designer Ribbon Sliders, Elegant Eggplant Dotted Scallop Ribbon, 1/8" Taffeta Ribbon in Basic Black and Pumpkin Pie, Brights and Subtles Designer Buttons, 1/2" Striped Satin Ribbon, Vintage Brad.  Retired Stampin' Up!: Cast-A-Spell Designer Series Paper, 1/4 in grosgrain in Perfect Plum, Basic Black, Whisper White, and Old Olive.
If you saw my post about the Owls, then you know that I made these to "save some money," (ya, right!).    But they were a fabulous way to use up some of my stash that I've hoarded over the past five years. 

Also, Stampin' Up! will be celebrating Digital Scrapbooking Day all next week with free downloads and savings on Digital Scrapbooking Kits!  And I will be celebrating every day next week here on my blog, including a chance to win some a CD of downloads.  So be sure to come back and see what all the fuss is about!

Wednesday, October 24, 2012

Window Framelit Fun Fold: Take 2

Here is the promised Christmas version of my Window Framelit trifold card:

Colors: Gumball Green, Cherry Cobbler, Very Vanilla.  Stamps: Scentsational Season, Family Reunion.  Big Shot: Window Collection Framelits, Banner Framelit Collection, Polk Dot Embossing Folder.  Accessories: Be of Good Cheer Designer Series Paper, Gum Ball Green Stitched Satin Ribbon, Festive Paper Piercing Pack.
How cute would it be if you opened up this card and found a cute family photo inside with a personalized greeting on it?  That was my thought when I made this card, but I haven't settled on my own personal Christmas Card yet this year.

Enjoy!

Monday, October 22, 2012

MDS Monday: Final Disneyland Pages

First off, I owe my readers and apology.  I've been promising posts I haven't delivered this past week.  The Stampin' Addicts My Digital Studio Blog Hop that was suppose to be this weekend got postponed until next month.  So watch for that November 16.

I did promise to show you some more pages from my Disneyland Album and today, I am delivering on that promise.  The pages I'm sharing today feature the pictures from Disney California Adventure:
Colors: Tempting Turquoise, Crushed Curry, Whisper White.  Digital Stamp Brushes: Hip and Handsome Overlays. Digital Punches: Tasteful Trims.  Digital Embellishments: Downtown Grunge Frames.  Fonts: Waltograph and Mouse Deco
I love the look on my older son's face in these picture.  He really did have fun at Disneyland, he just didn't want to smile for another picture.
Colors: Real Read and Basic Black.  Digital Punches: Circle.  Font: Tristan
 Wouldn't be Disney if you didn't stop to see a few characters along the way.
Colors: Pacific Point, Cherry Cobbler, Whisper White.  Digital Stamp Brushes: Solid Stripes.  Digital Punches: Tasteful Trims.  Digital Embellishments: Stitching and Brads.  Font: Script MT Bold
These pages were all about cramming a lot of pictures on each page so that the album wasn't 100 pages long. So they are light on embellishments and stamps and heavy on pictures.
Colors: Soft Suede, Early Espresso, Very Vanilla.  Digital Stamp Brushes: Decorative Overlays. Digital Embellishments: Mis-Stitched, Downtown Grunge Frames.  Font: Rockwell Extra Bold
If you missed the other pages from my Disneyland Album, you can click on the Disney tag below and you will see them all.  We are planning another trip to the Disneyland Resort next month to celebrate my birthday and check out the new Carsland.  Working on this album and sharing it with you is making me even more excited to go back!

To get back on track, on Wednesday, I will be sharing the Christmas Card I promised to share last Wednesday.  And on Friday, I will share the Halloween Wood projects I talked about last week too.  I hope you will come back and check them all out.

Wednesday, October 17, 2012

Branching out into Wood Crafts -- Temporarily

Colors: More Mustard, Early Espresso, Cajun Craze.  Accessories: Spice Cake Buttons (retired), Autumn Spice Specialty Designer Series Paper, Regal Collection Buttons, Linen Thread. Some Images © Stampin' Up!
These owls and pumpkins have a story.  About a month ago, I was at a local boutique and noticed some really cool owls and other fall wood decorations that were for sale.  If you are a crafter, then you know what thought came next, right:

"Certainly I can make that for a lot cheaper than I can buy it for here." 

You know you've had that thought too, right?   Otherwise, why would you be looking at a stamping blog?

First stop on this journey was the local wood shop.  I use the term "local" loosely because it is 30 miles from my house, and gas for my SUV is $3.80 a gallon.  I may or may not have gone a little crazy while I was there.  (You'll just have to wait for a future update to judge if was a little or a lot crazy).  This store is full of fun shapes for every holiday and season imaginable as well as just general home decor. They sell everything you need right there to put these projects together: glue, paint, paper, embellishments, etc, etc.

But if you know me at all, you know I DO NOT need to buy any more paper or embellishments to finish a craft project.  I have PLENTY of those things.  And lots of it is retired so I can't just use it for classes and demonstrations.  So see, I am actually saving money by buying all these projects so I can use up what I already have.  (If you followed that logic, you may or may not need the same intervention I need.)

However, I did forget one very key thing: I HATE working on wood projects.  I don't mind the painting so much as the sanding.  Not only do I despise it, it aggravates my carpal tunnel in away that stamping just doesn't.   While I was working on these, I was nearly crippled for a week.

I was so happy to have them done though and they look really cute in my dining room.  I have some Halloween decorations I made at the same time that I will show here next week too. 

I have yet to add up how much these actually cost to make (especially if you consider all the other craft stores I went to to get the paint when I ran out and all the hours I put into them). I'm afraid it is a lot more than I would have spent at the local boutique (which really was local - about a mile from my house).   But I did use up some of my stash, so that counts for something.

Monday, October 15, 2012

Window Framelit Fun Fold

First off, no MDS Monday this week, because on Friday I am participating in a Stampin' Addict's Blog Hop featuring My Digital Studio projects.  So come back on Friday to see a boatload of My Digital Studio ideas and stuff.  So today, you get a regular creative post.

At convention in July, Shelli Gardner showed a really fun card on the mainstage that featured the Window Framelits in a trifold card.  You can see her original card on her blog: So Shelli.  When I saw that card, I knew I would have to CASE it.  After all, my customers love to buy what I show, and I know they would have to have these Window Framelits if I showed them a card like that.

So for my September Stamp Clubs we made this card:

Colors: Basic Gray, Midnight Muse, Marina Mist, Summer Starfruit, Whisper White. Stamps: Friendship Preserves.  Big Shot: Window Framelit Collection, Polka Dot Textured Impressions Embossing Folder.  Accessories: Stampin' Write Markers, Summer Starfruit Stitched Satin Ribbon, Festive Paper-Piercing Pack, Polka Dot Parade Designer Series Paper, Simply Scored.
This window shape is fabulous for so many projects.  For this one, I used the two largest sizes and then scored them just a little bit off where the circle meets the square notches.  I adhered the flaps to the back and then added a few more framelits to the the top. 

I used the Festive Paper-Piercing Pack to get those paper piercings perfect like that.  In October, you can get that pack free when you purchase a Christmas Gift pack.  Contact me today for all the details.  And ff you come back on Wednesday, I will show you a second card I made with this same layout, but this time for Christmas.

Friday, October 12, 2012

Over the Top Swap

I know that convention was nearly three months ago, I still have a few swaps I haven't shared yet.  And since this one from the Over the Top Swap I hosted at the Stampin' Addicts Meet and Greet is a Halloween card, I thought I'd better share it before October is over.


Colors: Basic Black, Rich Razzleberry, Daffodil Delight, Old Olive, Pumpkin Pie, Whisper White.  Stamps: Spooky Bingo Bits.  Big Shot: Peek-a-Boo Frames Bigz L and Square Lattice Embossing Folder.  Embellishments: Basic Black 1/8" Taffeta Ribbon, Mini Brads, Polka Dot Parade Designer Series Paper .
So what makes this Over the Top?  First I did a color-block background with the Polka Dot Parade Designer Series Paper on Whisper White Card Stock and ran that layer through the Big Shot to give it a "quilted" texture.  Next, I added two rows of 1/8" Taffeta Ribbon to the bottom of the card and added a knot on each row.  Then I layered that on Razzleberry Card Stock and mounted it to a Basic Black Card base.  Then I added the Peek-A-Boo Frames with images on the inside AND the outside. When you open the windows, this is what you see:

Since the card was black, I added another piece white card stock to the inside and stamped it too:

So what do you think?  Is it Over the Top enough? 

Wednesday, October 10, 2012

Happy Fall!

The 10th of October already?  That means tomorrow we are six weeks from Thanksgiving and we are in the thick of my favorite season of the year: Autumn.  We have finally turned off the air aonditioning and turned on the heat.  Last weekend, I made the first pot of soup of the season.  And while the leaves in the mountains above us have been changing for a month, the leaves on the trees here in the valley are now starting to change too. 

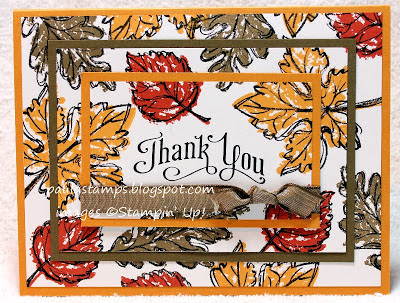
Today's card pays tribute to the changing leaves of the season:

Colors: More Mustard, Soft Suede, Early Espresso, Cajun Craze and Whisper White.  Stamps: Gently Falling and Perfectly Penned.  Accessories: Soft Suede 3/8" Taffeta Ribbon.
This card features the "Triple Stamping" technique that I have been seeing all over Pinterest and the blogosphere the past couple of months.  I first saw it done by Yapha Mason, but I know she was CASing someone else too.

Basically, you start with pieces of neutral card stock 2″ x 3 1/4″,  3″ x 4 1/4″  &  4″ x 5 1/4.”  Stack them on top of each other with the smaller layers in the center of the larger ones.  You can use a little bit of repositional adhesive to hold them in place.  Start stamping your images on the stack of card stock.  For a card like this, I would start with the largest stamp first and then work your way to the smaller stamps.  Where the edges of the card stock meet up, there will be a small gap in the images.  This is completely expected and you can fix that by adding a piece of cardstock 1/4" bigger than each layer behind them. 

This is also a good time to point out that Stampin' Up! is experimenting with selling individual stamps from three different stamp sets: Perfectly Penned (featured on this card) and Word Play from the Main Catalog, and Seasonal Saying from the Holiday Catalog.   Each stamp ranges in price from $4.95 to $6.95 and comes in a cello bag.  If Stampin' Up! finds there is a demand for these single stamp images, they may expand this offerings in the Spring.  So if you like this idea, vote with your dollars and buy a few to show Stampin' Up! you want this to be a permanent option.

Monday, October 8, 2012

MDS Monday: More Disney Pages

A few weeks ago, I told you about the Disneyland Album I made using MDS2.  Since then, I have actually received the completed album and I LOVE IT!  I love the quality of the print product you get with My Digital Studio.  They albums are just gorgeous.  And Stampin' Up! Announced last week a permanent price reduction in My Digital Studio Print Products.  Many of the prices are now on par or cheaper than they were during the recent print sale.  You can see the prices over on MyDigitalStudio.net.  Now I won't have to wait for a sale to get my projects printed!

I promised to share some more two-page layouts from that album and here they are:

Colors: Tempting Turquoise, Real Red, and Whisper White.  Digital Stamp Brushes: Hip and Handsome Overlays.  Digital Punches: Get It Done. Digital Embellishments: Celebrations ribbon and Downtown Grunge frames.
Colors: Not Quite Navy, Cherry Cobbler, More Mustard.  Digital Punches: Tasteful Trim Border.  Digital Embellishments: Stitching, Blast Off Digital Kit.
Colors: Crumb Cake, Chocolate Chip, Whisper White.  Digital Stamp Brush: The Open Seas, Vintage Overlays.  Digital Embellishments: Downtown Grunge Designer Series Paper, Misstitching.
Colors: Calypso Coral, Pool Party. Basic Gray and Whisper White.  Digital Stamp Brushes: Domestic Goddess Digital Kit. Digital Punches: Flag Punch.  Digital Embellishments: Domestic Goddess Designer Series Paper and Stitchings.

As you can see, every page had it's own distinctly look and feel.  Usually when I make an album for a trip, I try to keep a central theme and color. But part of what I love about Disneyland, is that every corner of the park has a different look and feel to it so I carried that over into the album.

I still haven't shown any pictures from Disney California Adventure.  That will have to wait for another MDS Monday in a few weeks. 

Wednesday, October 3, 2012

Frightening Feline

I have more Halloween-theme stamped than I really *need*.  When I saw the Frightening Feline Stamp in the Holiday Catalog, I tried to resist.  But you all know I am weak when it comes to stamps in general.  And after all, that is why I am a demonstrator: so I can justify all the stamps I have and pay for them. 

Colors: Tangerine Tango, Very Vanilla, Basic Black.  Stamps: Frightening Feline.  Accessories: Howlstooth and Scaringbone Designer Series Paper, Rhinestone Jewels, Clear Embossing Powder, Paper Piercing Tool and Essentials Paper-Piercing Pack.
This is just a really simple card but to add dimension to the image, I stamped it in Black Craft Ink and embossed it with clear embossing powder.  I also framed the image piece with paper piercing (which is hard to see in the picture.

 This is also the last project from my Spook-tacular Stampin' Buffet that I haven't already featured on my blog.  And today is the last day to RSVP for this Saturday's class.  So what are you waiting for? Contact me today, and let me know which projects you would like to make. I'll see you there!

Monday, October 1, 2012

MDS Monday: Altering Templates

Today's MDS Monday features a different way to use the templates that are included with MDS2+ or with some of the downloads. Templates are a fabulous way to make quick pages and albums, but  sometimes, you just want a different colors and elements than what is included in the template.  So that is what I am going to show you today.

First of all, to access the templates, you need to choose a size of projects.  For this example, I used a 12x12 project.  Then you want to click on Designer (which is the top choice):
The next screen will show you all the available templates in that size:
For this project, I chose the one from Sun Garden which is included with MDS2+, but you can choose any of them that you have.  Remember the album templates have several different templates included so if you click on them, you will see the pages in the preview window.  On the next screen you can choose which pages of the album templates you would like to use for this project.  Sun Garden only has a one page template so that is what I used.

When the template came up, I just added my pictures and text and this is what the page looked like:

Sun Garden 12x12 Template

The great thing about MDS is in about five minutes you can have a completed page just by using the templates.  But I wanted to change up the colors and papers on this project, just because the Sun Garden colors aren't my favorite.  But using the template for the layout is so much quicker than starting from scratch. So, I just went through and changed the colors, all the papers and most of the stamps and this is what I came up with:
Sun Garden 12x12 Template.  Digital Stamp Brushes: Cottage Garden.  Digital Accessories: Woodland Walk DSP.

These pictures are from my girlfriend trip to Lake Tahoe last spring.  These girls have been my best friends for about 30 years and we try to get together every few years for a weekend away from our families and just cry and laugh together.  They always remind me of that quote by Baz Luhrmann: "Understand that friends come and go,but for the precious few you should hold on. Work hard to bridge the gaps in geography and lifestyle because the older you get, the more you need the people you knew when you were young." I hope you have friends like that too.