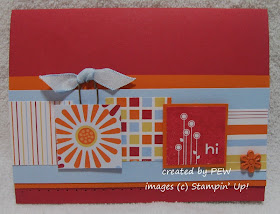
Sorry I've been absent this week. My family enjoyed some time at Lake Tahoe and I didn't get a chance to schedule the post before I left. But I did want to share this card because it features the new Razzleberry Lemonade paper that will be available July 1. Doesn't that just sound yummy? I was worried that it would be too bright, but I really do like it.
The sketch is based on a card Holly (aka CatRules) posted on Stampin' Addicts. It is simple, but it is perfect for using some printed paper scraps or to stamp a background on a piece of plain card stock. If you would like to play along with this or any other challenge, please visit the general forum section over at www.stampinaddicts.com.
Recipe:
Stamps: Oval All
Paper: Razzleberry Lemonade Designer Series Paper, Razzleberry, Crushed Curry and Whisper White card stock
Ink: Razzleberry
Accessories: Scalloped Oval and Oval punch
▼
Friday, June 26, 2009
Saturday, June 20, 2009
Card Candy Winner!
Congratulations to MaryJo. She's the winner of the roll of 1/4" Chocolate Chip Grosgrain Ribbon. Thanks to everyone who has visited and commented this week.
Thursday, June 18, 2009
New In Colors
I promised a look at the new 2009-2010 In Colors today and I aim to keep my promises whenever possible. I have to admit that it's the same story every year for me. I see the new colors and I think, "Really, that is what's popular?" And then by the end they are prying them out of my ink-stained fingers. I'm still working on liking some of these colors, but they are already starting to grow on me.This card features the brand new Melon Mambo (bright pink) and Rich Razzleberry (purple) with Basic Black. I am generally not a pink and purple person by nature. But I do like these together, especially with the black. This card also features my current favorite, cannot-use-it-enough Big Shot Die: Flowers, Daisy #2. A little gingham ribbon, bling and paper piercing round the card out. This was my card for last week's Stampin' Addicts Sketch Challenge #15.
And this is my card for this week's sketch challenge. It features Crushed Curry (yellow), Dusty Durango (rust) and - my favorite of the new colors - Soft Suede (brown). Also notice the fabulous Polka Dot Ribbon. I love it. It's reversible too so the other side is just a plain grosgrain. AND pay extra special close attention to that great image from Thoughts and Prayers. Notice that the flowers and branches are different colors and match the new papers? That's because for the first time, Stampin' Up is offering MARKERS to match the In Colors!!!!! Thanks for listening Stampin' Up!
The last card features Crushed Curry, Soft Suede, Bermuda Bay (turquoise) and Melon Mambo. I made this at a shoe box swap last weekend so I must give the credit for the cute card to fellow Utah demonstrator Vicky (Nanny911 on Stampin' Addicts) for this one. That fun robot is a brand new set that will be in the new catalog too called Lots of Bots. We stamped it in VersaMark and used silver embossing powder on it, then water colored it. I love the little nut, bold and screw stamp we used for the background. Thanks for the great project Vicky.
I hope you've enjoyed this look at the new In Colors. Remember, you are running out of time to be eligible for the BLOG CANDY. If you left a comment during the blog hop, just leave another comment on this or yesterday's Faux Alligator post to be eligible for a roll of 1/4" Grosgrain Ribbon in Chocolate Chip. The winner will be selected on Friday afternoon!
Wednesday, June 17, 2009
Faux Alligator Technique
A big thank you to all of you who visited during the Bon Voyage Blog Hop. There were some really fantastic projects out there during this hop. I hope you enjoyed it as much as I did. The wheels are already churning for the next one in a few months so stay tuned.
I promised I would tell you how to do the Faux Alligator Technique that I used on the Wild Wall Hanging.
First off though, I need to practice my good Stamping manners and tell you that I learned this technique from my good friend and fellow demonstrator Amy Bell over at A New Song. She learned the technique from Jackie Topa at Addicted to Stamping. Here's a closer look at the "Alligator" skin:
Supplies: card stock, VersaMark or Craft ink pad, clear embossing powder, bone folder or stylus, heat gun. It also works better if the card stock your are working with is bigger than what your finished project will be so you have something to hold on to while completing all the steps.
Step 1: Cover a piece of card stock with VersaMark or Craft ink. I used Old Olive card stock and VersaMark for mine.
Step 2: Sprinkle clear embossing powder over the entire section. To do an area as big as I did (approx 10" x 2-1/4") it took about a third of a bottle.
Step 3: Using the bone folder or stylus, draw lines through the embossing powder horizontally and vertically, cleaning the extra powder off you tool occassionally. To look more alligatorish, vary the width of the lines and don't worry about getting them straight.
Step 4: Heat set the powder with the heat gun. Voila!
I'd love to see what you come up with for this technique too. So if you try it out, post a link here so we can all see what you made.
Saturday, June 13, 2009
Bon Voyage Blog Hop Stop #20
Welcome to stop #20 on Stampin' Addicts Bon Voyage Blog Hop. It doesn't matter if you came here from Holly's Stampin' Mania (love ya Holly!) or if you are just joining the hop because each blog is linked in a chain to make one continuous loop. I hope you are enjoying this look at some of the stamps on the Last Chance List and all the fabulous talent you'll see along the way! Remember, the links will be removed Tuesday at midnight so be sure the bookmark your favorites so you can visit again.
Maybe I should have started my post with "Welcome to the Jungle" because I get to show you some projects made with an old favorite: Wild About You. (Do you have a little Guns N' Roses in your head now? Sorry, I'll fix that in a minute). This is one of the first stamp sets I ever bought when I was first introduced to Stampin' Up! I loved it then and now because it is perfect for scrapbooking, giftables and of course, cards. It's a set I reach for over and over and it is definitely staying in my personal stash even though it is only available from Stampin' Up! until June 30. Don't forget, you can click on any of the pictures to get a closer look.
I bought this set orginally with scrapbooking in mind. After all, who isn't "Wild About the Zoo" and who doesn't have Zoo pictures to scrapbook?
Recipe:
Stamps: Wild About You and Schoolbook Alphabet
Colors: Kraft, More Mustard, Always Artichoke and Chocolate Chip
Accessories: Tab Punch, Brads, Marker.
Here I used the set to make a wall hanging with a fun "Faux Alligator" technique. (Come back on Wednesday, and I'll tell you how to do it.) These animals are perfect for adding accents to a decor project for a jungle or zoo-themed room like my boys' bathroom or my neighbor's little boy's room.
Recipe:
Stamps: Wild About You
Colors: Old Olive, Chocolate Chip, Basic Black, More Mustard, Always Artichoke, and Sahara Sand
Big Shot: Serif Essentials Alphabet
Accessories: chipboard, jumbo eyelets, clear embossing powder, heat gun, Chocolate Chip and Always Artichoke grosgrain ribbon
Remember "Pink Elephants on Parade" from Dumbo? (Told you I'd fix that other song in your head.) This last project is to show you that even though this sets screams EARTH ELEMENTS to me, you can go less traditional and make a really fun girl card with it too. I love pink and gray together, especially Pink Pirouette (may she shortly RIP).
Recipe:
Stamps: Wild About You
Colors: Basic Gray, Pink Pirouette and Regal Rose
Accessories: Scalloped Edge punch, markers, Pink Pirouette stripped grosgrain, mat pack and paper piercer.
I promised a little BLOG CANDY so here it is: a brand new roll of yummy 1/4" Chocolate Chip Grosgrain Ribbon. To win: leave a comment here during the tour letting me know which of the three project you liked best AND come back later this week and leave another comment (I promise to show you the Faux Alligator technique on Wednesday and a sneak peak at the brand new In Colors on Thursday). You must have a US mailing address to be eligible. I will pick a winner on the afternoon of Friday, June 19.
I hope you enjoyed this detour to the jungle. Thanks for stopping by. Next stop on the Bon Voyage Tour: Beth's Stamp Me a Rainbow and a real oldie but goodie: Heartfelt Thanks. Be sure to check out Stampin' Addicts too. It's a great place for Stampin' Up! lovers. (And if you still have Guns N' Roses or Dumbo in your head, try singing It's a Small World. That fixes it for me every time.)
Saturday, June 6, 2009
June Scrapbook Class/Hostess Club
WHEN: Wednesday, June 17 at 6:30 p.m.
WHERE: Red Robin Restaurant, 316 E. Winchester Dr. Murray Utah (south east of Fashion Place Mall)
COST: $7 for the scrapbook layout and card. $3 with a $25 purchase or free with a $30 purchase.
RSVP: By noon on Friday, June 12
All of my classes this month feature products on the last chance list. Get them before they are gone. You can see the lists by clicking on the Last Chance icon on the right side.
The 2 page, 12x12 scrapbook layout features retiring In Colors Tangerine Tango, Pacific Point and Baja Breeze textured card stock, jumbo grommets and the striped In Color ribbon. The stamps are from the Sweet Celebration set and the Lazy Days Wheel. The pictures are all 4x6 in size. If you bring them with you, you can finish the entire layout in one night! (3 pictures are portrait and 2 are landscape).
The card features more retiring In Colors: Pink Pirouette, Baja Breeze and pairs them with an old favorite Close to Cocoa. The stamps, Doodle This and Say it With Scallops are both on the last chance list and won't be available after June 30.
June Technique Class/Hostess Club
WHEN: Tuesday, June 16 at 6:30 p.m.
WHERE: Paula's House (call for directions)
COST: $6 includes the two projects plus recipe cards for the techniques. Or free with a $25 purchase
RSVP: By Monday, June 15 at noon (no need for hostess club members to RSVP)
This month I am featuring retiring products in all my class projects. It's always an exciting time when we get to say good bye to old favorites because that means there will be new stamps, papers, and accessories to play with very soon!
Our technique for the class is masking. This card features both regular masking and reverse masking. It also features one of the very first stamp sets I ever bought that is on the last chance list and soon won't be available to purchase, Wild About You, and two of the retiring In Colors. (You can see the complete list by clicking the Last Chance icon on the right side of the screen.)
And since I showed both kinds of masking on that card, I decided to shake things up a bit and show you a fun fold for the other project. It also features retiring Designer Series Paper and Riding Hood Red textured card stock as well as the Curly Label Punch Bundle that will be going away soon too:
Hope to see you there!
Busy Week
Man, it's been a busy week. It was my older son's last week of Kindergarten and my in laws have been in town. Hasn't left much time for creating. But I did take the chance to use some retiring Washington Apple Designer Series Paper to make a few cute creations.
This was for Stampin' Addict's sketch challenge 14. The sketch was inspired by a card in the 2008 Spring Summer Collection book. I used the square punches too which was part of the accessory challenge over there too. (Love it when I make something that fits more than one category.)
Then on Thursday, I set out to make my son's teacher an end of the school year gift. Nothing like the last minute since Friday was the last day of school. I modified Becky Roberts' Milk Carton holder to make it a bit wider and taller. I filled it with things that might help her enjoy her summer vacation a little more: a water bottle with a Crystal Light Drink Mix; sunscreen, bug spray, lotion, a blockbuster gift card, and a little fan. I also modified the milk carton pattern to make it taller so I could fit in more of the teacher's favorite candies: Reese Peanut Butter Cups. I hope she liked how it turned out.
Card Recipe (all Stampin' Up!):
Colors: Riding Hood Red, Pumpkin Pie, Bashful Blue
Designer Series Paper: Washington Apple
Stamps: Say it with Scallops
Accessories: Ribbon, Clips, Flower Brads
Teacher Gift Recipe (all Stampin' Up except for contents):
Colors: Riding Hood Red, Pumpkin Pie, Bashful Blue
Designer Series Paper: Washington Apple
Stamps: Lazy Days Wheel (Occasions Mini Catalog)
Big Shot: Flowers, Daisy #2 Bigz Die
Accessories: Ribbon and button